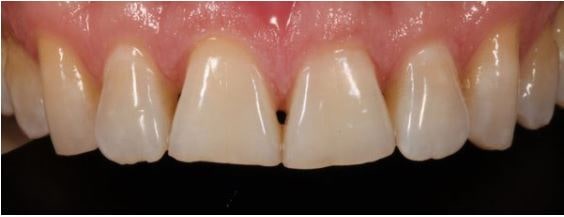
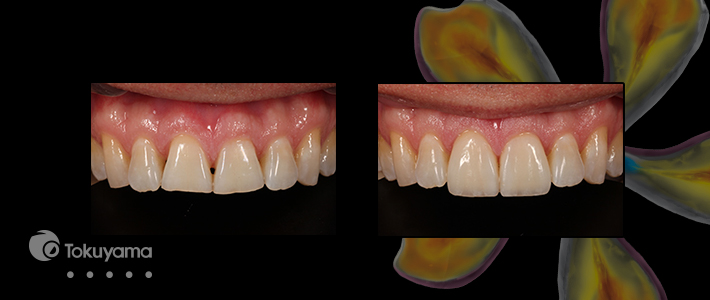
How to Create Natural-Looking Tooth Calcification Effects Within Direct Composite ResinsSeptember 30, 2019 by AACD Executive OfficeSPONSORED STORY | Tokuyama By Kevin M. Brown, DDS, AAACD The popularity and demand for direct composite resin restorations in the anterior segment are surging, and the esthetically minded dentist has a large array of materials at his or her disposal from which to choose in order to create natural-looking restorations. This article will focus on the art and technique of creating natural-looking calcification effects within a direct anterior composite. The following case images will illustrate two different ways in which white calcification effects can be created within a direct anterior composite restoration. These techniques can be used either individually or in conjunction with each other to achieve the desired results. In this particular case, both techniques were used. Case StudyThe patient presented for a postorthodontic evaluation of worn incisal edges of the maxillary central incisors (Fig 1). The orthodontist did a great job positioning the teeth with Invisalign, giving attention to the gingival zeniths knowing that the incisors would eventually be restored to proper length. While the patient whitened their teeth with custom bleach trays and 9% hydrogen peroxide (Phillips ZOOM), a diagnostic wax-up and silicone putty index was fabricated.
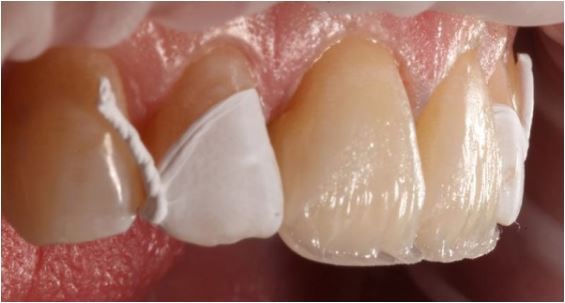
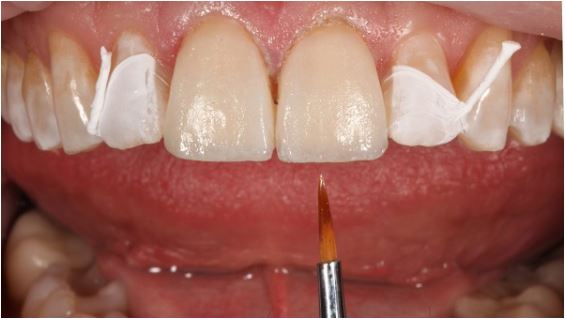
Tooth preparation was exceedingly minimal using a medium grit diamond bur (Komet) at a 45-degree angle to lightly bevel the facio-incisal edge (Fig 2). An air abrasion unit (MicroEtcher II; Zest Dental Solutions) was then used to clean and microetch the unprepared facial enamel. Isolation was achieved using the OptraGate lip retractor (Ivoclar Vivadent) and Teflon tape on the lateral incisors. A total etch protocol was followed using Optibond Solo Plus (KavoKerr) as the bonding agent.
Figure 2: Tooth preparation with facio-incisal bevel and air abrasion. The composite used for this restoration was Estelite Omega (Tokuyama Dental America). Using the silicone putty index, the lingual shelf was established with Milky-White (MW) composite followed by the dentin layer (DA2 and DA1 mixed) (Fig 3). A conservative amount of translucent (Trans) composite was placed along the incisal one-fourth to allow for subtle incisal translucency, mimicking the patients natural teeth. A thin layer of enamel composite (EA1) was feathered from the mid-facial section to the incisal edge to just shy of the final facial contour. This would leave room to add any color effects, which would then be covered with a final layer of MW shade.
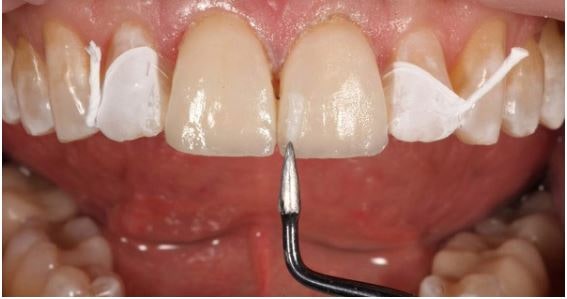
The patient had two types of subtle white calcifications occurring on their natural enamel, which needed to be replicated in composite for ultimate esthetic blending of the final restoration. One type is a very soft and diffuse white splotchiness along the line angles and is best created using a bleach-white composite, which can be more easily feathered for the diffuse appearance. In this case, the BL1 composite works well, as it is a highly opaque white but can be feathered nicely. The BL1 composite was initially placed with a composite instrument, and excess composite was removed until a reasonable amount remained (Fig 4). Feathering and diffusing of the BL1 composite were then achieved using the OptraSculpt instrument (Ivoclar Vivadent), which has a small foam pad that makes it easy to wipe away the BL1 composite until the desired effect is achieved.
Liquid resin is difficult to feather and diffuse but works great for other characteristics such as craze lines or more intense spots or effects. In this case, after placing the white diffuse areas with the BL1, a fine-point sable brush was used to carefully paint small, subtle spots along the incisal portion of the restoration to mimic those on the lateral incisors (Fig 5). With colored liquid resins, a little goes a long way, so care must be taken not to overdo it. By this point in the procedure, the natural teeth will be dehydrated, and any white spots normally present will be very exaggerated, so it is helpful if you have a preoperative photo on a nearby computer screen to use as a reference.
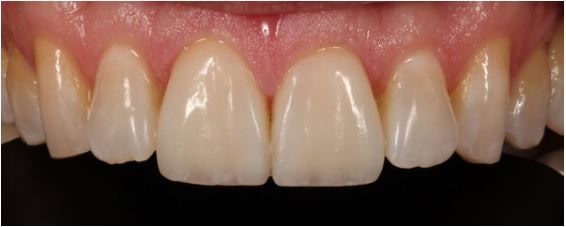
Once the white calcification effects were completed, a very thin final layer of MW was placed to just beyond the final facial contour and cured. After the initial cure of the final layer, glycerin gel was placed over the entire restorations and cured again for 20 seconds to help with the oxygen inhibition layer. Finishing and polishing was completed using a variety of diamond and carbide burs (Komet), Soflex disks (3M ESPE), composite polishing points (Kerr), and diamond paste (Cosmedent). The final result shows the difference between the soft diffuse white effect of the BL1 composite in contrast with the more intense white spots of the white liquid resin (Fig 6). Both are effective but must be used in proper context, depending on what effect you are trying to replicate.
AcknowledgmentThe author recognizes and thanks Dr. Paola Leone and Dr. Gregory Vaughn of Leone & Vaughn Orthodontics in Bellevue, Washington for their outstanding orthodontic care and attention to detail in positioning the maxillary central incisors in this case. |
Featured StoriesAre you passionate about perfecting your craft in esthetic dentistry? Here's why every dentist serious about refinin... Read More The American Academy of Cosmetic Dentistry (AACD) is thrilled to announce that the 42nd Annual Scientific Session will ... Read More by Bobbi Stanley, DDS How do you navigate AACD 2026 Aventura to ensure you get the most bang for your buck, learn the mo... Read More When you attend the AACD Scientific Session, you are choosing to surround yourself with greatness. The AACD Annual Scien... Read More Facebook Feed |